멀티스레드의 주의사항! _ 레이스 컨디션
시작하기에 앞서
앞서 쓴 멀트스레드의 기본 사용법에 대한 포스팅에 이런 글이 있었다.
https://blog.fxjodo.com/blog/116/
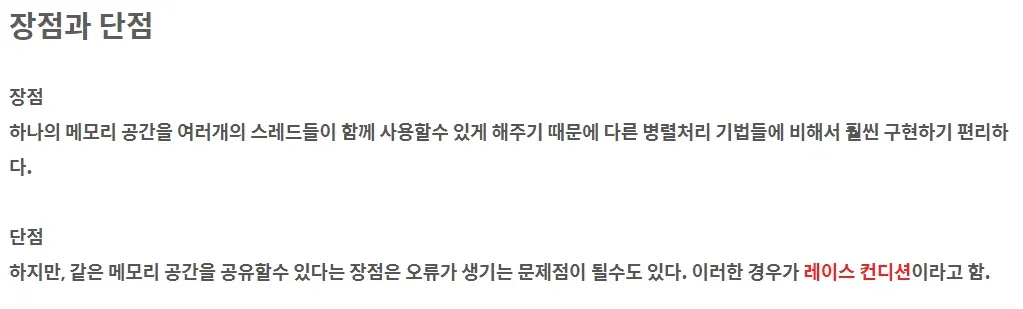
이번에는 이 레이스 컨디션이 무엇인가? 와 해결방법에 대해 다뤄보겠다.
레이스 컨디션이란?
이 부분은 예제를 보면 쉽다. 예제를 알아보자
문제점 예제
#include <iostream>
#include <thread>
#include <atomic>
#include <mutex>
#include <chrono>

using namespace std;

int shared_memory(0);

int main()
{
	auto count_func = [&]() {
		for (int i = 0; i < 1000; i++)
		{
			this_thread::sleep_for(chrono::milliseconds(1));
			shared_memory++;
		}
	};

	thread t1 = thread(count_func);
	thread t2 = thread(count_func);

	t1.join();
	t2.join();

	cout << "After" << endl;
	cout << shared_memory << endl;

	return 0;
}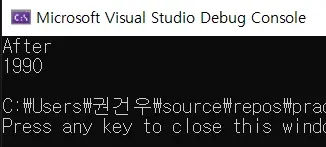
왜 2000이 아니라 1990이 나올까?
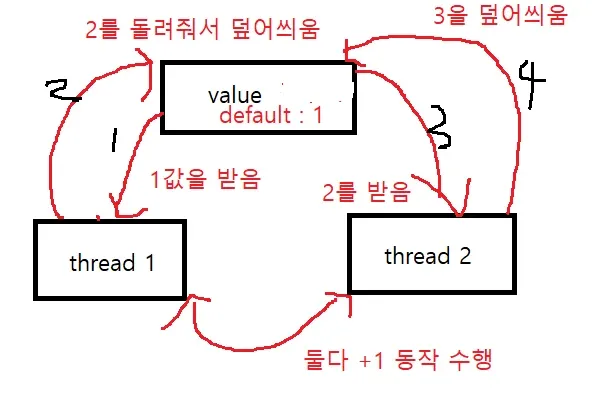
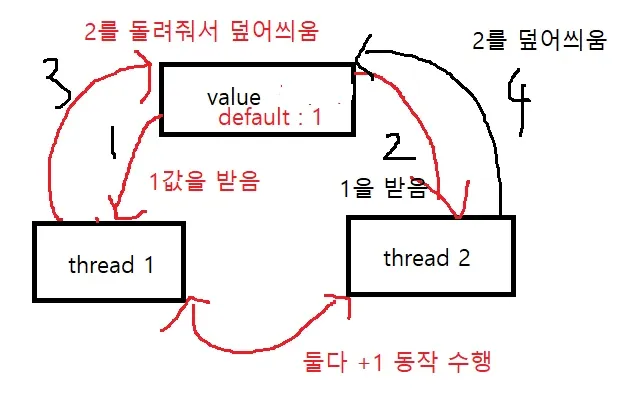
그건 cpu가 값을 읽어와서 쓰고 덮어쓰는 동작때문이다.
1. cpu로 shared_memory의 값을 읽어오고
2. cpu안에서 값을 더하고
3. 더해진 값을 덮어씀
이 동작을 하는 도중에 t1이 1의 동작 하는 사이에 t2가 1의 동작을 수행해서 더하기가 증발된 것이다.
아마 우리가 생각했던 동작은 이럴것이다.
하지만 실제동작에서는 이럴수 있다.
해결방법
해결방법에는 정말 여러가지 방법이 있다. atomic, mutex의 lock, unlock, lock_guard, 최근나온 scope_lock까지
하나하나 설명하기에는 너무 길어서 그냥 사용방법에 대한 코드를 나열하겠다. 자세한 사항은 주석에 달려있다.
atomic
//atomic 방법
//include 생략..

using namespace std;

//위에서 말한 1, 2, 3단계를 하나의 단계로 만듬.
//느려짐 ㅎ
atomic<int> shared_memory(0);

int main()
{
	auto count_func = [&]() {
		for (int i = 0; i < 1000; i++)
		{
			this_thread::sleep_for(chrono::milliseconds(1));
			//여기서는 ++가 atomic의 오버로딩된 증감연산자임.ㅎ
			shared_memory++;
			//shared_memory.fetch_add(1);
		}
	};

	thread t1 = thread(count_func);
	thread t2 = thread(count_func);

	t1.join();
	t2.join();

	cout << "After" << endl;
	cout << shared_memory << endl;

	return 0;
}
Mutex 의 lock, unlock
//include 생략..

using namespace std;

mutex mtx;
int shared_memory(0);

int main()
{
	auto count_func = [&]() {
		for (int i = 0; i < 1000; i++)
		{
			this_thread::sleep_for(chrono::milliseconds(1));

			//하나씩 처리
			mtx.lock();
			shared_memory++;
			mtx.unlock();
		}
	};

	thread t1 = thread(count_func);
	thread t2 = thread(count_func);

	t1.join();
	t2.join();

	cout << "After" << endl;
	cout << shared_memory << endl;

	return 0;
}
lock_guard, scope_lock <- c++ 17에서 가능
//lock guard, scope lock
//include 생략

using namespace std;

mutex mtx;
int shared_memory(0);

int main()
{
	auto count_func = [&]() {
		for (int i = 0; i < 1000; i++)
		{
			this_thread::sleep_for(chrono::milliseconds(1));

			// 17버전에서 추가된 사항, lock_guard보다 이걸 더 권장함
			//안전한듯
			scoped_lock lock(mtx);

			//17이전버전
			//lock_guard<mutex> lock(mtx);
			//17버전에서는 이렇게 사용가능
			//lock_guard lock(mtx);
			shared_memory++;
		}
	};

	thread t1 = thread(count_func);
	thread t2 = thread(count_func);

	t1.join();
	t2.join();

	cout << "After" << endl;
	cout << shared_memory << endl;

	return 0;
}
그 외 주의사항
#include <iostream>
#include <thread>
#include <atomic>
#include <mutex>
#include <chrono>

using namespace std;

int shared_memory(0);

int main()
{
	auto count_func = [&]() {
		for (int i = 0; i < 1000; i++)
		{
			//밑의 코드를 없애면 정확한 값이 나오는데
			//그 이유는 이 코드가 잘못된게 아니라
			//this_thread::sleep_for(chrono::milliseconds(1));
			shared_memory++;
		}
	};

	//이건 너무 빠르게 연산할수 있는 코드이기 때문에
	//t2가 실행이 되기전에 t1이 이미 계산을 끝마쳐서
	//오류가 없는것처럼 보이는거임.
	thread t1 = thread(count_func);
	thread t2 = thread(count_func);

	t1.join();
	t2.join();

	cout << "After" << endl;
	cout << shared_memory << endl;

	return 0;
}
참고
홍정모의 따배씨++
후기
따배씨++ 추천합니다!